Hello all!
I just wanted to share how I installed an electronic temperature controller to my 16 bottle Vinotemp. These instructions will be specific to my brand/model however I imagine it should be similar for other makes and models. Attempt this install at your own Risk! If done incorrectly, this could cause damage to your wine cooler and/or home!
I've only ever seen DIY's that show how to wire up a plug in style temperature controller, Ala Ranco or etc....such as this...
http://www.etcsupply.com/ranco-etc1...er-p-87.html?gclid=CKr-v9rOibgCFegWMgodGHoAvw
I'm sure these work great, however I can't justify spending ~$80 on a temperature controller for a wine cooler I only paid $50 for! That and I had a feeling there should be something else out there that can accomplish the same task for far less money.
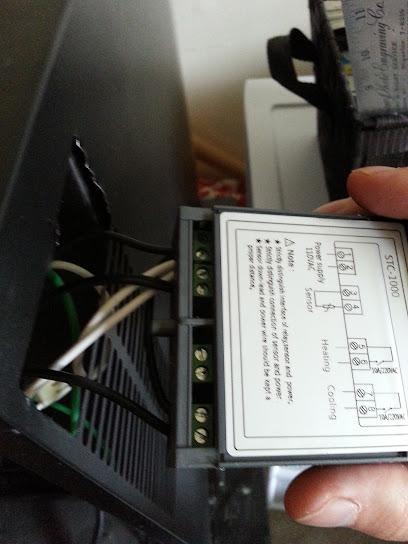
Behold, the STC-1000!

It can be had on amazon for $22...Theres other vendors on Amazon that list it for cheaper, however this was the only one that specifically said it included the sensor.
http://www.amazon.com/All-purpose-Temperature-Controller-STC-1000-sensor/dp/B00862G3TQ
This is a 110v AC temperature switch that can control both a cooling and heating device. It includes a temperature sensor and is programmable. For this application, we'll only use the cooling loop circuit.
Make sure the unit is unplugged before you begin! Probably best to give it a few minutes before getting started to let any residual power that may exist to disperse.
Start by removing the back cover from your Vinotemp.
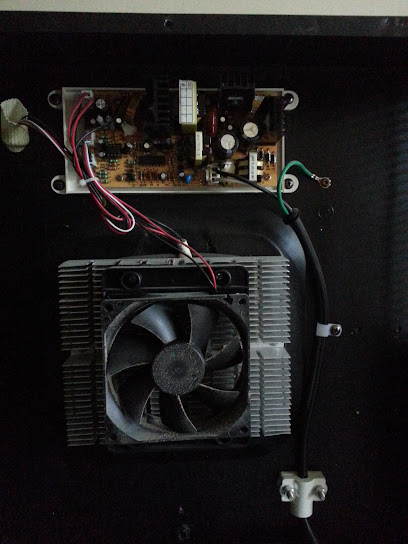
Here's a close up of the main power wires that come in from the wall plug. The black and white wires on the white connector are the main power wires (black=HOT, white=Neutral). The green wire is the ground.

Unplug the connector with the black and white wires. Remove the ground. Remove any of the wire ties that hold the cable to the back of the unit.
Carefully use a razor to strip back some of the insulation on the end of the cable.
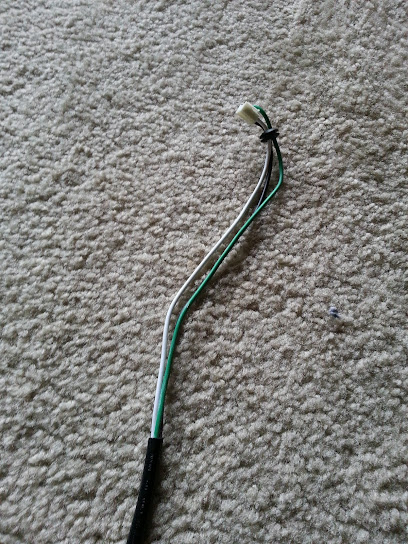
Cut the white and black wires about 4" away from the connector. Strip a little of the insulation from both ends.
I used this guys diagram. Seems they use these units commonly for home brew setups:
http://www.homebrewtalk.com/f11/how-hard-wire-stc-1000-a-385792/
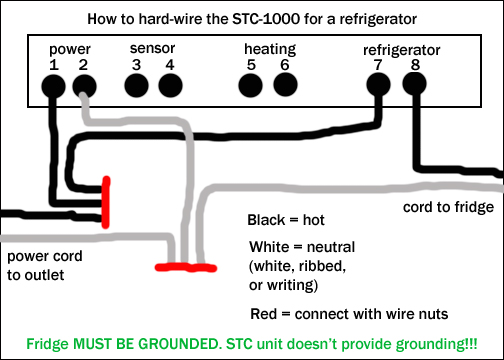
Insert the black wire from the power cable into terminal 1. Create a small jumper to go from terminal 1 to terminal 7, insert it and tighten the screws. Insert the white wire from the power cable into terminal 2. Insert the white wire from the white connector into terminal 2 as well and tighten the screw. Insert the black wire from the white connector into terminal 8 and tighten the screw.
When your done, it should look something like this: You can also see the sensor wire connected here.

Before you connect the temp sensor, fish it through the drain hole.

Pull it through and place it where you think is the best location for sensing temperature inside your box. Some people may want to attach it to an inside wall of the vino. For now, I just left mine sticking out as such:

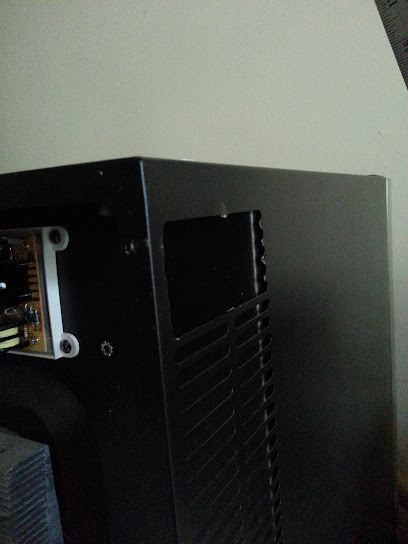
Next, we need a place to mount the unit. It just so happens the vents on the side of my Vinotemp were just wide enough to fit the control unit if I cut out the ribs. I used a pair of snips and cut away 4 ribs to make room for the unit to slide in. There will be some extra room at the top, but thats okay.
Fish all the wires from the controller through your new mounting hole.
Plug the white connector back into the circuit board. Re-connect the green ground wire. The unit comes with orange plastic retaining clips. Slide it onto the side of the controller and push it tight up against the inside of hole you created for the controller. I used only one of these orange clips and its holding it fine.

Re-install the cable stays on the back and tidy up the wiring. This is how mine looks right before I put the back cover on.

Plug in the power cable and make sure everything works right. Be careful at this point - If you have any wires crossed or shorted this could cause a fire so be careful!
Here's the controller powered up and installed.

Follow the instructions to program it. I set mine for 18.3 Deg. Celsius (Fahrenheit not available on this model) which should be about 65 F. Theres also a parameter (F2) for the deviation from the set point before it will kick on. Mine is set at .5. Parameter F3 is the "compressor delay time". This is time delay that the unit will wait before turning the cooling unit back on. I set mine to 1 minute.
Put the back of the vino back on and you should be done!
And here's mine running and controlling to 18.3 deg. C!

I hope this helps guys...Its a far cheaper and cleaner way to improve the temperature control of your Vino.
Let me know if anyone has any questions!
I just wanted to share how I installed an electronic temperature controller to my 16 bottle Vinotemp. These instructions will be specific to my brand/model however I imagine it should be similar for other makes and models. Attempt this install at your own Risk! If done incorrectly, this could cause damage to your wine cooler and/or home!
I've only ever seen DIY's that show how to wire up a plug in style temperature controller, Ala Ranco or etc....such as this...
http://www.etcsupply.com/ranco-etc1...er-p-87.html?gclid=CKr-v9rOibgCFegWMgodGHoAvw
I'm sure these work great, however I can't justify spending ~$80 on a temperature controller for a wine cooler I only paid $50 for! That and I had a feeling there should be something else out there that can accomplish the same task for far less money.
Behold, the STC-1000!
It can be had on amazon for $22...Theres other vendors on Amazon that list it for cheaper, however this was the only one that specifically said it included the sensor.
http://www.amazon.com/All-purpose-Temperature-Controller-STC-1000-sensor/dp/B00862G3TQ
This is a 110v AC temperature switch that can control both a cooling and heating device. It includes a temperature sensor and is programmable. For this application, we'll only use the cooling loop circuit.
Make sure the unit is unplugged before you begin! Probably best to give it a few minutes before getting started to let any residual power that may exist to disperse.
Start by removing the back cover from your Vinotemp.
Here's a close up of the main power wires that come in from the wall plug. The black and white wires on the white connector are the main power wires (black=HOT, white=Neutral). The green wire is the ground.
Unplug the connector with the black and white wires. Remove the ground. Remove any of the wire ties that hold the cable to the back of the unit.
Carefully use a razor to strip back some of the insulation on the end of the cable.
Cut the white and black wires about 4" away from the connector. Strip a little of the insulation from both ends.
I used this guys diagram. Seems they use these units commonly for home brew setups:
http://www.homebrewtalk.com/f11/how-hard-wire-stc-1000-a-385792/
Insert the black wire from the power cable into terminal 1. Create a small jumper to go from terminal 1 to terminal 7, insert it and tighten the screws. Insert the white wire from the power cable into terminal 2. Insert the white wire from the white connector into terminal 2 as well and tighten the screw. Insert the black wire from the white connector into terminal 8 and tighten the screw.
When your done, it should look something like this: You can also see the sensor wire connected here.
Before you connect the temp sensor, fish it through the drain hole.
Pull it through and place it where you think is the best location for sensing temperature inside your box. Some people may want to attach it to an inside wall of the vino. For now, I just left mine sticking out as such:
Next, we need a place to mount the unit. It just so happens the vents on the side of my Vinotemp were just wide enough to fit the control unit if I cut out the ribs. I used a pair of snips and cut away 4 ribs to make room for the unit to slide in. There will be some extra room at the top, but thats okay.
Fish all the wires from the controller through your new mounting hole.
Plug the white connector back into the circuit board. Re-connect the green ground wire. The unit comes with orange plastic retaining clips. Slide it onto the side of the controller and push it tight up against the inside of hole you created for the controller. I used only one of these orange clips and its holding it fine.
Re-install the cable stays on the back and tidy up the wiring. This is how mine looks right before I put the back cover on.
Plug in the power cable and make sure everything works right. Be careful at this point - If you have any wires crossed or shorted this could cause a fire so be careful!
Here's the controller powered up and installed.
Follow the instructions to program it. I set mine for 18.3 Deg. Celsius (Fahrenheit not available on this model) which should be about 65 F. Theres also a parameter (F2) for the deviation from the set point before it will kick on. Mine is set at .5. Parameter F3 is the "compressor delay time". This is time delay that the unit will wait before turning the cooling unit back on. I set mine to 1 minute.
Put the back of the vino back on and you should be done!
And here's mine running and controlling to 18.3 deg. C!
I hope this helps guys...Its a far cheaper and cleaner way to improve the temperature control of your Vino.
Let me know if anyone has any questions!


