Well guys
I finally finished it. I'll take you along the ride with some pictures.
Here she is just waiting to be demoed.

I slowly took everything apart compressor and all. All that was left was the cabinet and fans. A lot of screw and panels to figure out where to put them back hahah

When I had it totally stripped down is when I realized how many holes I was going to have to fill. Man to they use a lot of screws. I used some food grade silicone that I got the idea from the "China hutch" build on here.

To be honest, prior to this I had little to no carpentry work to my credit and I had not idea how I was going to do this. I spent a lot of time at the computer researching what tools to buy (was finishing my garage at the same time hahah) and how to properly use them. I ended up getting a router table and table saw to help make things easier. I made a few mistakes a long the way but you live and learn.
I bought a couple custom shelves from forrest just to see how he did it and then I went at the rest myself. As you will see if the pictures, my first mistake was running the bottom "slots" of my first 2 shelves the wrong way. I guess I will be laying those cigars sideways in the tray instead of front to back hahahah


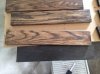
After the trays were done I moved on to making some false fronts for them. I decided on a dark walnut stain on pine wood. Don't ask me how I decided on that but I think it turned out really well. I did 3 coats of stain to get it to the shade that I wanted. There was about 3-4 hours of sanding between the trays and drawer fronts. This is the spot where I think the guys who know what they are doing can seriously cut down on the time it takes to make these things.

ATTACH=CONFIG]42784[/ATTACH]

I actually had to move the faces into the house to dry because it got so humid here in MN.
After that I attached some handles to the faces. I got the handles for like 3 bucks at home depot and just liked the look of the brushed copper. After a couple of these I got really good at it. Only took a couple minutes to do each.

Then I attached the faces to the trays using some 3/4" screws and glue. I left them in the cabinet with the door open for a few days just to enjoy looking at my work and take a break hahaha

The next step was to solder the wires from the existing fans to the wires I cut off the fans that come with the humi-care xg1000. I was going to splice them in and try to have the unit run 6 fans but didn't want to burn the thing out. I ended up getting a small unit to run a couple fans at the top for extra circulation. There is a "dead space" in the back of the cabinet that houses the backs of the fans. I put an extra fan at the bottom fans into the space to push the humidified air from the lower compartment that held the humi-care. That way the other fans were drawing from air that was humidified instead of stale air that had just been sitting there.


When I was done with all the wiring I lugged the unit downstairs to the room where I was going to keep it. It had a home right beside the GoldenTee machine hahaha I had to wait for a couple lid hinges that I ordered to show up so this was another little break for me. The hinges were for the bottom face that I was going to use to hide the humi-care unit and a few lbs of beads. Just something to keep it clean and if I needed to get at them I could just flip the false front up.

When the hinges came it was just a matter of screwing in 4 screws and voila!!

It took me about a month total to totally finish this thing. I am just waiting on the small hydra active humidifier to show up and it will be running. JUst using the humi-care in there right now to "season" it and it holds at 70 perfectly top to bottom. I will deal that down a couple %'s and all will be good to go. Now I just have to try and fill it up hahahah
All in, if you don't count buying the tools (was buying them anyways) or the cabinet (that we were trying to sell and couldn't) I have 200 in the wood and building materials. Then another 180 in the two humidification devices and 8 lbs of beads. Just to give you some idea of cost.
Hope you guys like it. I impressed myself and am really happy with the outcome.
Here she is just waiting to be demoed.
I slowly took everything apart compressor and all. All that was left was the cabinet and fans. A lot of screw and panels to figure out where to put them back hahah
When I had it totally stripped down is when I realized how many holes I was going to have to fill. Man to they use a lot of screws. I used some food grade silicone that I got the idea from the "China hutch" build on here.
To be honest, prior to this I had little to no carpentry work to my credit and I had not idea how I was going to do this. I spent a lot of time at the computer researching what tools to buy (was finishing my garage at the same time hahah) and how to properly use them. I ended up getting a router table and table saw to help make things easier. I made a few mistakes a long the way but you live and learn.
I bought a couple custom shelves from forrest just to see how he did it and then I went at the rest myself. As you will see if the pictures, my first mistake was running the bottom "slots" of my first 2 shelves the wrong way. I guess I will be laying those cigars sideways in the tray instead of front to back hahahah
After the trays were done I moved on to making some false fronts for them. I decided on a dark walnut stain on pine wood. Don't ask me how I decided on that but I think it turned out really well. I did 3 coats of stain to get it to the shade that I wanted. There was about 3-4 hours of sanding between the trays and drawer fronts. This is the spot where I think the guys who know what they are doing can seriously cut down on the time it takes to make these things.
ATTACH=CONFIG]42784[/ATTACH]
I actually had to move the faces into the house to dry because it got so humid here in MN.
After that I attached some handles to the faces. I got the handles for like 3 bucks at home depot and just liked the look of the brushed copper. After a couple of these I got really good at it. Only took a couple minutes to do each.
Then I attached the faces to the trays using some 3/4" screws and glue. I left them in the cabinet with the door open for a few days just to enjoy looking at my work and take a break hahaha
The next step was to solder the wires from the existing fans to the wires I cut off the fans that come with the humi-care xg1000. I was going to splice them in and try to have the unit run 6 fans but didn't want to burn the thing out. I ended up getting a small unit to run a couple fans at the top for extra circulation. There is a "dead space" in the back of the cabinet that houses the backs of the fans. I put an extra fan at the bottom fans into the space to push the humidified air from the lower compartment that held the humi-care. That way the other fans were drawing from air that was humidified instead of stale air that had just been sitting there.
When I was done with all the wiring I lugged the unit downstairs to the room where I was going to keep it. It had a home right beside the GoldenTee machine hahaha I had to wait for a couple lid hinges that I ordered to show up so this was another little break for me. The hinges were for the bottom face that I was going to use to hide the humi-care unit and a few lbs of beads. Just something to keep it clean and if I needed to get at them I could just flip the false front up.
When the hinges came it was just a matter of screwing in 4 screws and voila!!
It took me about a month total to totally finish this thing. I am just waiting on the small hydra active humidifier to show up and it will be running. JUst using the humi-care in there right now to "season" it and it holds at 70 perfectly top to bottom. I will deal that down a couple %'s and all will be good to go. Now I just have to try and fill it up hahahah
All in, if you don't count buying the tools (was buying them anyways) or the cabinet (that we were trying to sell and couldn't) I have 200 in the wood and building materials. Then another 180 in the two humidification devices and 8 lbs of beads. Just to give you some idea of cost.
Hope you guys like it. I impressed myself and am really happy with the outcome.
Attachments
-
 249 KB Views: 247